# Tutorial
# Start a simple demo
Zerker is great for making some action-packed effects, such as awesome animations, love animations, pop-up animations or meteor shower backgrounds.
# Start example
The specific effect is as follows
Detailed code please check https://github.com/flutterkit/zerker/tree/master/example (opens new window)
# 1. The first step is to create a zerker widget.
class _MyHomePageState extends State<MyHomePage> {
Widget build(BuildContext context) {
return Scaffold(
appBar: AppBar(
title: Text(widget.title),
),
body: Center(
child: Zerker(app: MyZKApp(), clip: true, interactive: true, width: 350, height: 350),
));
}
}
# 2. Inherited from ZKApp.
class MyZKApp extends ZKApp {
# 3. Preload assets in the init function
init() {
    super.init();
    stage.color = Colors.blueGrey;

    Map<String, dynamic> urls = {
      "boy": {"json": "assets/boy.json", "image": "assets/boy.png"},
      "bg": "assets/bg.png",
    };

    // preload all assets
    ZKAssets.preload(
        urls: urls,
        onProgress: (scale) {
          print("Assets loading ${scale * 100}%");
        },
        onLoad: () {
          initScene();
          _loaded = true;
          print("Assets load Complete");
        });
}
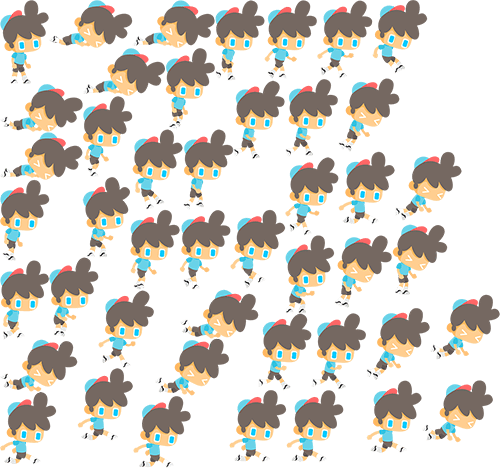
# 4. Create various elements
Note: To create a sprite animated material map, please see https://flutterkit.github.io/zerkerdocs/guide/animation.html#sequence-frame-animation (opens new window)
    // add title
    title = ZKText()
      ..position.x = appWidth / 2
      ..position.y = 20
      ..text = "Please click anywhere"
      ..setStyle(
        color: Colors.blueGrey,
        backgroundColor: Colors.greenAccent,
        textAlign: TextAlign.center);
    stage.addChild(title);

    // add boy
    boy = ZKSprite(key: "boy")
      ..setScale(1)
      ..anchor.y = 1
      ..position.x = size.width / 2
      ..position.y = appHeight - 16
      ..animator.make("run", ["Run ({1-15}).png"])
      ..animator.make("jump", ["Jump ({1-15}).png"])
      ..animator.make("dead", ["Dead ({1-15}).png"])
      ..animator.play("run", 25, true);
    stage.addChild(boy);
# 5. Add an interactive event
_addAction() {
    boy.onTapDown = (event) {
      bg.stop();
      _jumping = false;
      boy.animator.play("dead", 20);
    };

    stage.onTapDown = (event) {
      if (event.target == boy) return;
      if (_jumping) return;

      bg.play();
      _jumping = true;
      boy.animator.play("jump", 20);
      ZKTween(boy)
          .to({"y": appHeight - 120}, 500)
          .easing(Ease.circ.easeOut)
          .chain(ZKTween(boy).to({"y": appHeight - 16}, 500).easing(Ease.circ.easeIn).onComplete((obj) {
                boy.animator.play("run", 25, true);
                _jumping = false;
              }))
          .start();
    };
}
# 6. You're done
You're done
# Make a simple game
In this example we will learn how to make a simple game. The zerker is great for small game development and you will find it really that simple.
# Notice: Recent improvements in content...
# More examples
More zerker examples you can view here https://github.com/flutterkit/zerker-samples (opens new window)
If you are interested in zerker then you are welcome to provide a better example for me.